
- Inscrit
- 13 Août 2018
- Sujets
- 676
- Messages
- 3,424
- Score de réaction
- 2,655
- Age
- 51
- Localisation
- Dans le pays de la mounjetado
- Couleur de collants préférée
- Tan
- Genre
- Homme
- Pays
- France
Here's how to share photos directly on the forum without going through an external image host.
1st Method (the easiest)
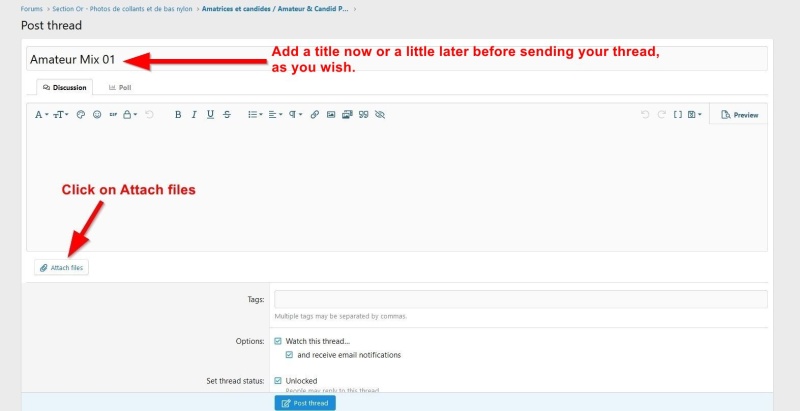
Step1) Start by adding a title to your thread (or later, before sending your thread if you prefer). Then click the "Attach files" button to go and find your photos.
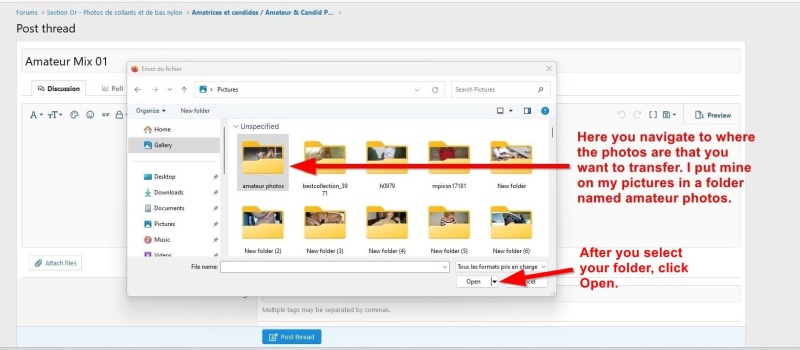
Step 2) Navigate to where the photos are that you want to transfer.
After you select your folder, click Open.
Step 3) Select one or more photos to upload to your thread (or message). Then click Open.
Important: Please, the size of your photos should not be too large. Each photo should be a maximum of 3 MB, no more !

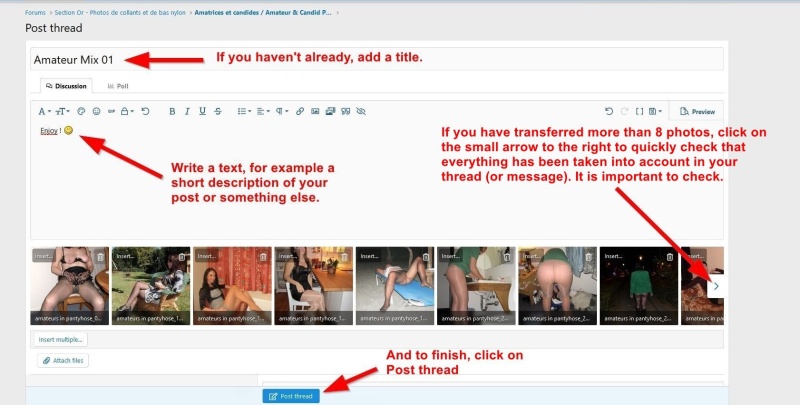
Step 4) If you have transferred more than 8 photos, to check that everything is in place and that there is no photo that is too heavy and has not been taken into account, click on the small arrow to the right to see what is happening for all the other photos. If nothing abnormal appears, then you can continue with peace of mind.
If you have not yet decided, it now or never to write the title of your thread .
Then write a text of your choice, this is what will precede the photos. In this 1st method, you must type a text (short description of the content for example).
Then finally, that's it, you can submit your thread if everything is OK. So click on Post thread.

Like magic, the photos were inserted into your thread (thanks to an add-on) and it was validated on the forum.")
2nd Method (a bit more technical)
The first 3 steps are the same as in the 1st method. We'll repeat them for beginners though.
Step 1) Give your thread a title (or a little later before bubmit it). And click the Attach files button.
Step 2) Navigate to where the photos are that you want to share.
After you select your folder, click Open
Step 3) Select one or more photos to insert into your thread (or message). Then click Open.
Important: your selected photos must be about 3 MB maximum (which is already a huge in photo size).
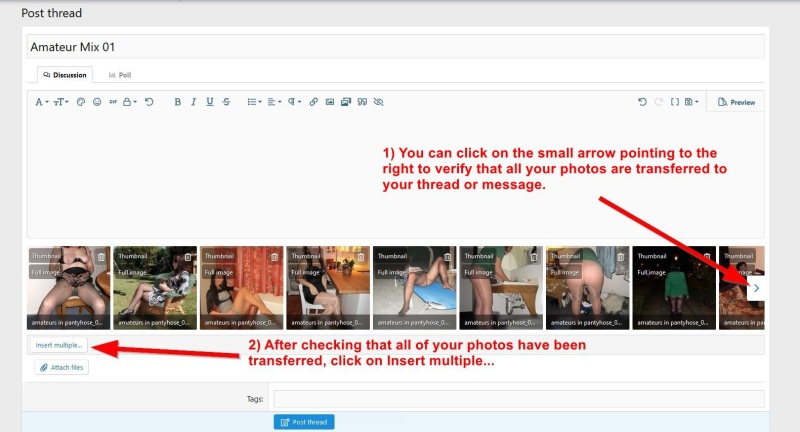
Step 4) If you have transferred more than 8 photos, do a quick check for the rest of the photos by clicking on the small arrow to the right.
With this 2nd method, you can refrain from typing a text in the preamble of the photos but if you wish, you can do so (a short description of the content for example).
If all the photos have been added to your thread (or message), then now you can serenely click on Insert multiple...
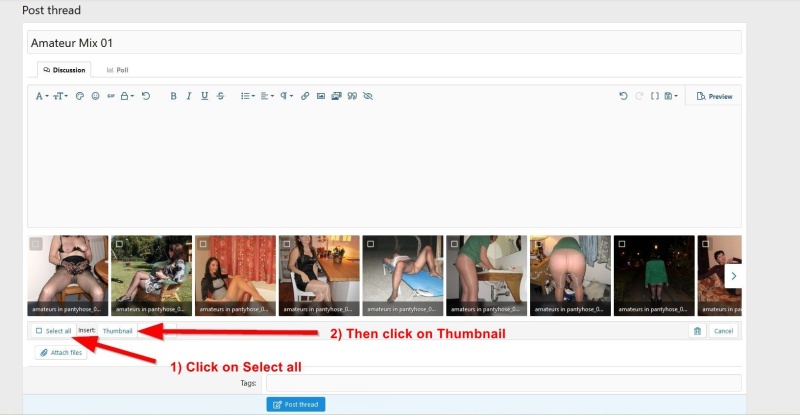
Step 5) First, click Select All. Click Select All. Then click Thumbnail.
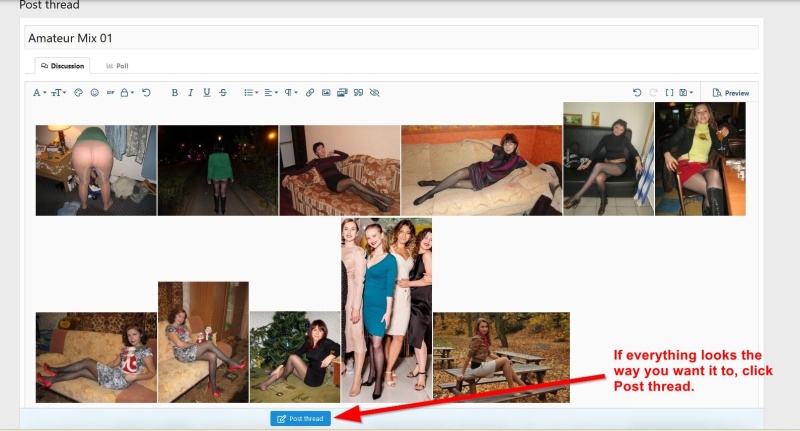
Step 6) Check it out and if everything looks the way you want it to, click Post thread.
And you're done!
3rd Method to insert 1 or 2 Full-Size photos
If you wish, you can insert 1 or 2 full-size photos maximum in your subject or message and the other photos as thumbnails. Here is how to do it below after uploading your photos, so we skip the first 2 steps listed above.
If you wish, you can insert 1 or 2 photos maximum in real size in your thread (or message) and the other photos in thumbnails.
In any case, when you publish 1 or 2 photos only, do not hesitate.
Once again, the first 3 steps are the same as before.
Step 1) Add a title to your threadnow or later, just before sending it, if you are unsure about what to name it. In any case, you should click on the Attach files button.
Step 2) Navigate to where the photos are that you want to transfer.
After you select your folder, point your mouse cursor over it and click the Open button in the small window (or double-click the folder).
Step 3) Make your choice by selecting one or more photos to insert into your thread (or message). Then click Open.
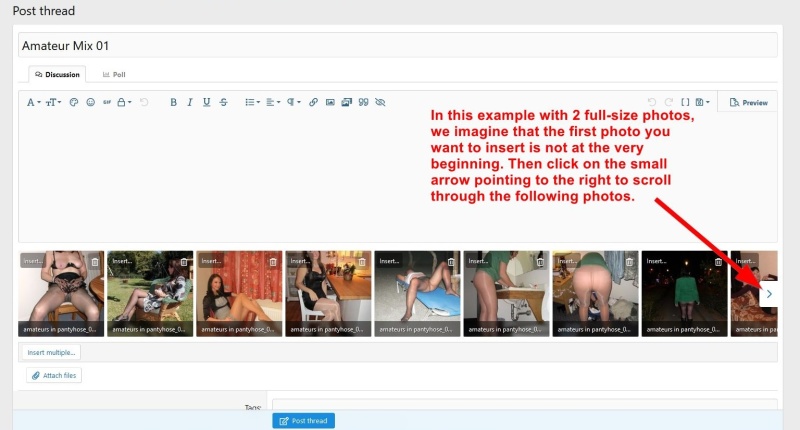
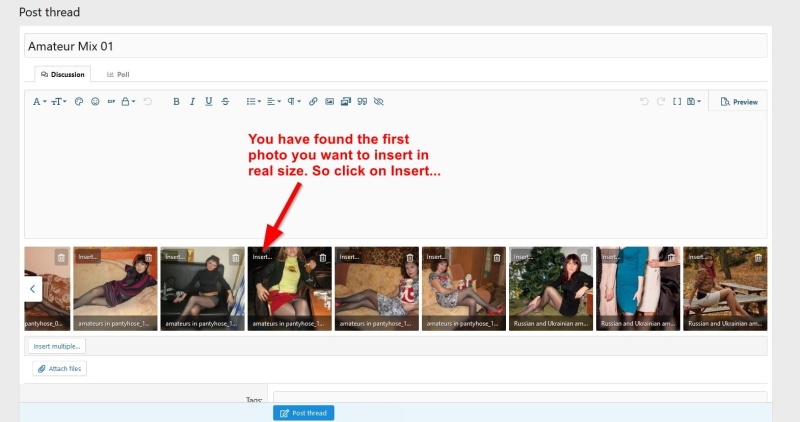
Step 4) In this example, let's imagine that you have transferred more than 8 photos and that the first photo you want to put in real size is not at the beginning of the selection. You will then have to scroll through the photos. So click on the small arrow on the right. And if necessary, re-click on the right arrow icon until you reach the place where the photo is located.
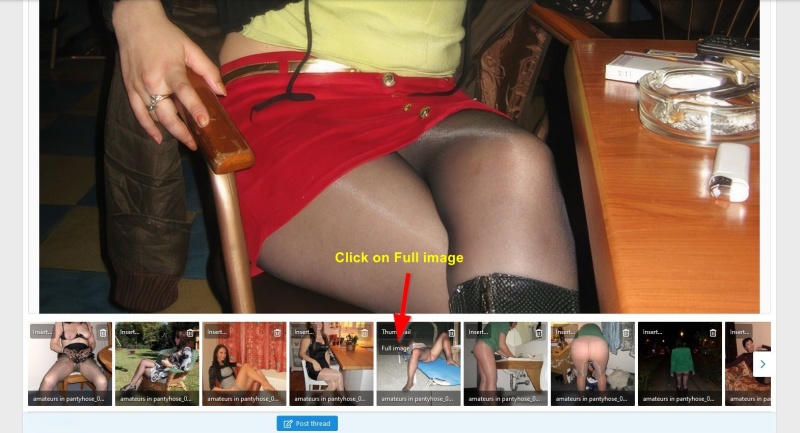
Step 5) You have found one of your favorite photos that you want to insert in priority and in real size. Then click on Insert... (top left of the thumbnail)
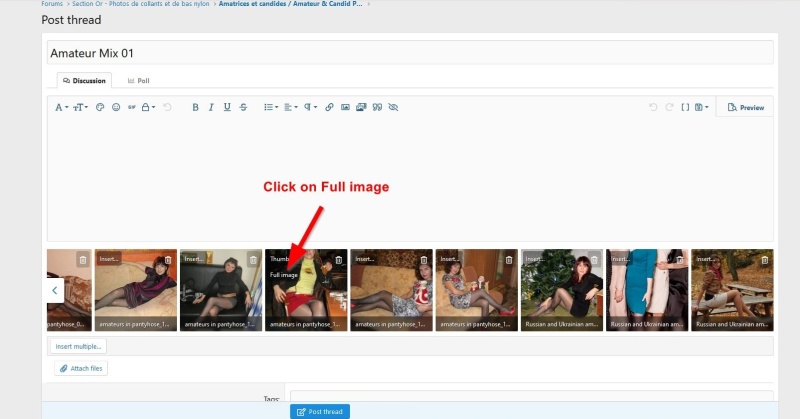
Step 6) Then click on Full image (still at the top left of the thumbnail)
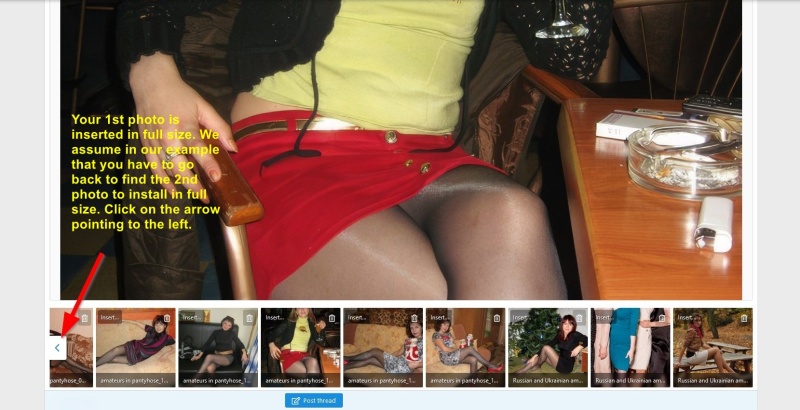
Step 7) Once your photo is properly arranged in real size, all you have to do is install the 2nd photo in its real size if that is what you want. In a case where it is not next to it and is further to the left (therefore in the previous photos), you will then have to click on the small arrow pointing to the left. We therefore imagine this eventuality, then click on the left arrow. And re-click again on the left arrow icon if necessary (as for the right arrow).
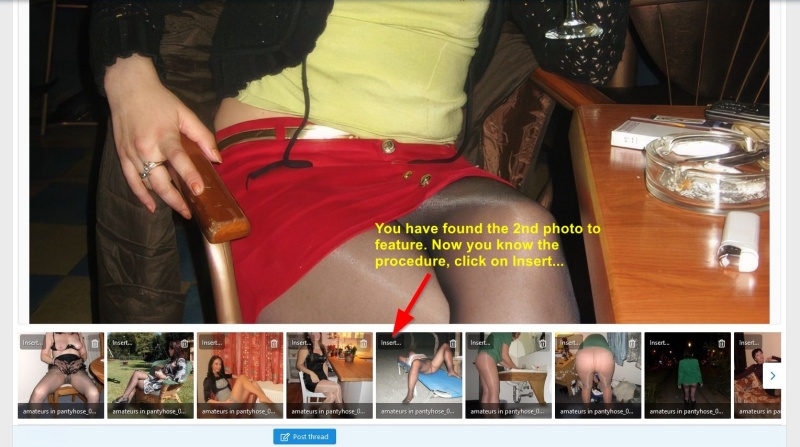
Step 8) You are now at the place where the 2nd photo to insert in its actual size is located. Now you know the procedure, so you click on Insert...
Step 9) Of course, you click now on Full image for this 2nd photo to finalize the insertion of the photo.
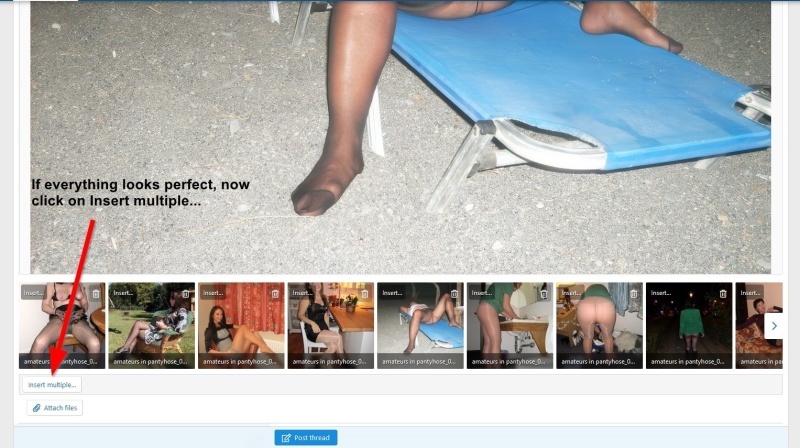
Step 10) You have just installed your 2nd full-size photo. After having introduced your 2 full-size photos, all you have to do is add all the photos in thumbnails which will be arranged below. Click on Insert multiple...
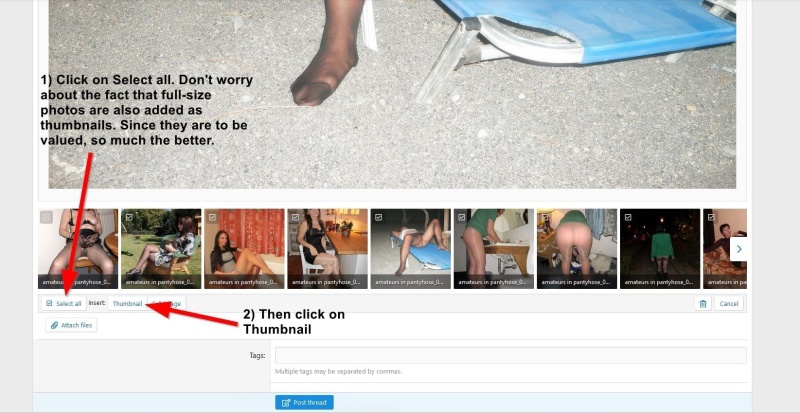
Step 11) To insert all thumbnails, click Select all. Don't worry about duplicate photos for full-size photos, it doesn't matter at all if they are republished as thumbnails. The point is to feature them so all the better!
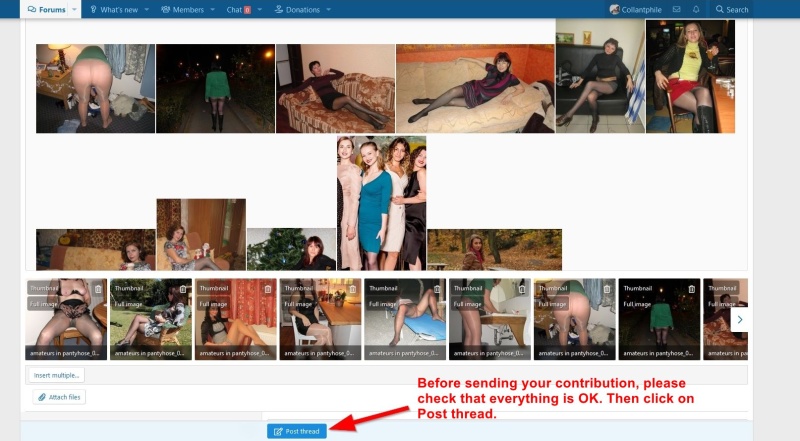
Step 12) All you have to do is take a quick look to make sure that all your photos have been included in your thread (or message) and finally click on Post thread. You will have a nice contribution valued with 1 or 2 full-size photos, do not hesitate when you only have one photo to publish or to accompany many thumbnails.
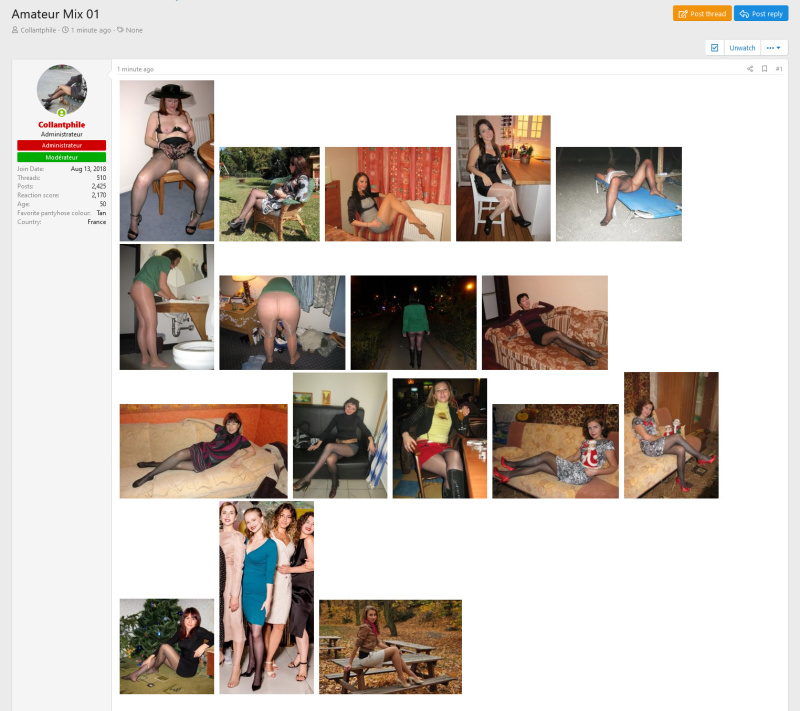
Result of the published thread...
We hope you found this tutorial useful. Now it's time to share!

1st Method (the easiest)
Step1) Start by adding a title to your thread (or later, before sending your thread if you prefer). Then click the "Attach files" button to go and find your photos.
Step 2) Navigate to where the photos are that you want to transfer.
After you select your folder, click Open.
Step 3) Select one or more photos to upload to your thread (or message). Then click Open.
Important: Please, the size of your photos should not be too large. Each photo should be a maximum of 3 MB, no more !
Step 4) If you have transferred more than 8 photos, to check that everything is in place and that there is no photo that is too heavy and has not been taken into account, click on the small arrow to the right to see what is happening for all the other photos. If nothing abnormal appears, then you can continue with peace of mind.
If you have not yet decided, it now or never to write the title of your thread .
Then write a text of your choice, this is what will precede the photos. In this 1st method, you must type a text (short description of the content for example).
Then finally, that's it, you can submit your thread if everything is OK. So click on Post thread.
Like magic, the photos were inserted into your thread (thanks to an add-on) and it was validated on the forum.
2nd Method (a bit more technical)
The first 3 steps are the same as in the 1st method. We'll repeat them for beginners though.
Step 1) Give your thread a title (or a little later before bubmit it). And click the Attach files button.
Step 2) Navigate to where the photos are that you want to share.
After you select your folder, click Open
Step 3) Select one or more photos to insert into your thread (or message). Then click Open.
Important: your selected photos must be about 3 MB maximum (which is already a huge in photo size).
Step 4) If you have transferred more than 8 photos, do a quick check for the rest of the photos by clicking on the small arrow to the right.
With this 2nd method, you can refrain from typing a text in the preamble of the photos but if you wish, you can do so (a short description of the content for example).
If all the photos have been added to your thread (or message), then now you can serenely click on Insert multiple...
Step 5) First, click Select All. Click Select All. Then click Thumbnail.
Step 6) Check it out and if everything looks the way you want it to, click Post thread.
And you're done!
3rd Method to insert 1 or 2 Full-Size photos
If you wish, you can insert 1 or 2 full-size photos maximum in your subject or message and the other photos as thumbnails. Here is how to do it below after uploading your photos, so we skip the first 2 steps listed above.
If you wish, you can insert 1 or 2 photos maximum in real size in your thread (or message) and the other photos in thumbnails.
In any case, when you publish 1 or 2 photos only, do not hesitate.
Once again, the first 3 steps are the same as before.
Step 1) Add a title to your threadnow or later, just before sending it, if you are unsure about what to name it. In any case, you should click on the Attach files button.
Step 2) Navigate to where the photos are that you want to transfer.
After you select your folder, point your mouse cursor over it and click the Open button in the small window (or double-click the folder).
Step 3) Make your choice by selecting one or more photos to insert into your thread (or message). Then click Open.
Step 4) In this example, let's imagine that you have transferred more than 8 photos and that the first photo you want to put in real size is not at the beginning of the selection. You will then have to scroll through the photos. So click on the small arrow on the right. And if necessary, re-click on the right arrow icon until you reach the place where the photo is located.
Step 5) You have found one of your favorite photos that you want to insert in priority and in real size. Then click on Insert... (top left of the thumbnail)
Step 6) Then click on Full image (still at the top left of the thumbnail)
Step 7) Once your photo is properly arranged in real size, all you have to do is install the 2nd photo in its real size if that is what you want. In a case where it is not next to it and is further to the left (therefore in the previous photos), you will then have to click on the small arrow pointing to the left. We therefore imagine this eventuality, then click on the left arrow. And re-click again on the left arrow icon if necessary (as for the right arrow).
Step 8) You are now at the place where the 2nd photo to insert in its actual size is located. Now you know the procedure, so you click on Insert...
Step 9) Of course, you click now on Full image for this 2nd photo to finalize the insertion of the photo.
Step 10) You have just installed your 2nd full-size photo. After having introduced your 2 full-size photos, all you have to do is add all the photos in thumbnails which will be arranged below. Click on Insert multiple...
Step 11) To insert all thumbnails, click Select all. Don't worry about duplicate photos for full-size photos, it doesn't matter at all if they are republished as thumbnails. The point is to feature them so all the better!
Step 12) All you have to do is take a quick look to make sure that all your photos have been included in your thread (or message) and finally click on Post thread. You will have a nice contribution valued with 1 or 2 full-size photos, do not hesitate when you only have one photo to publish or to accompany many thumbnails.
Result of the published thread...
We hope you found this tutorial useful. Now it's time to share!
Dernière édition: